
Japanese bread recipes
For a country that’s better known for its ramen and sushi, Japan boasts a surprisingly rich bread culture. Since its arrival in Japan in the mid-1500s, the leavened delicacy has found its way into the hearts of locals and become a staple of the Japanese diet. To get a taste of the unique variety of bread a typical bakery in Japan offers, roll up your sleeves and try these 9 Japanese bread recipes for yourself.
1. Curry pan (カレーパン)

Image adapted from: What Santa left behind
Kare pan (カレーパン), or curry bread, is a deep-fried bread filled with warm savoury curry. You can find this popular snack in bakeries and convenience stores, though nothing beats a freshly fried kare pan from the former.
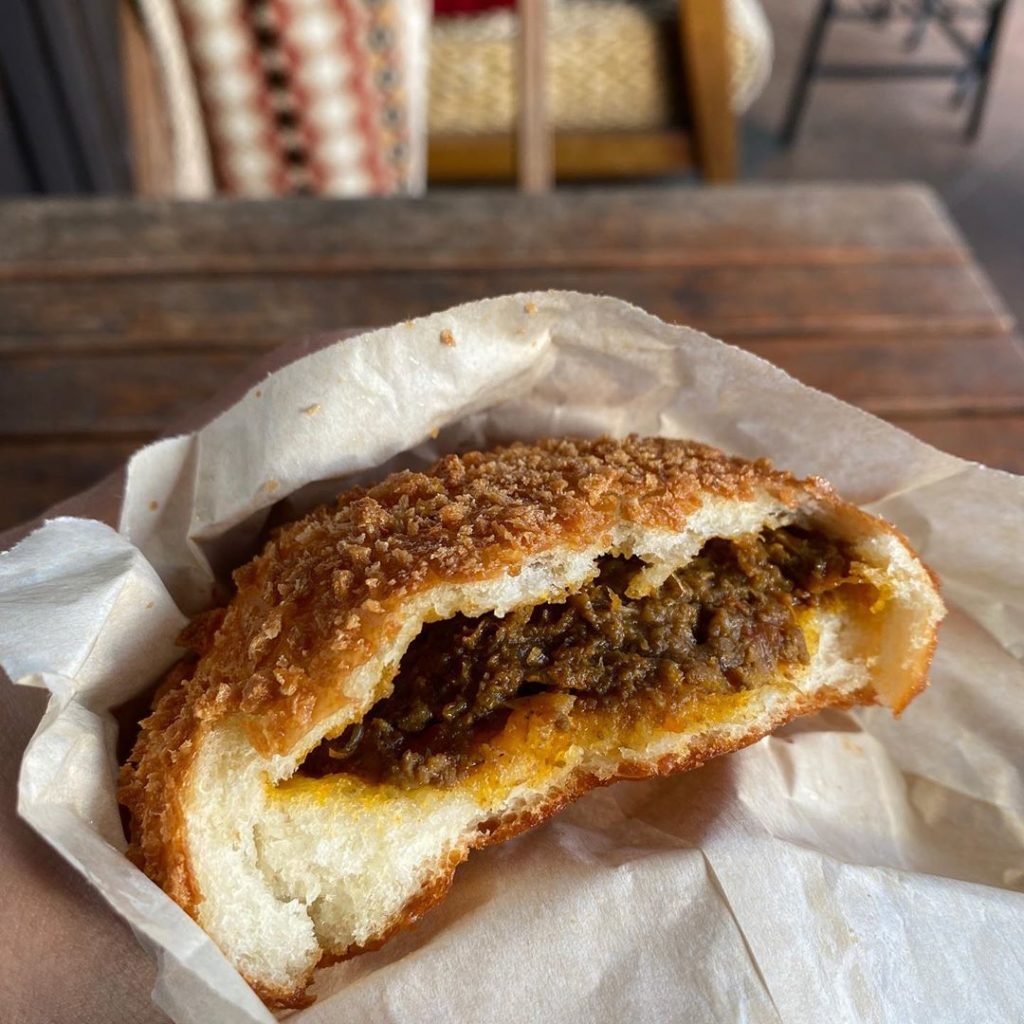
Image credit: @taiki_beef_curry
Though this recipe requires you to make curry from scratch, feel free to use reheatable pre-packed curry. Leftover Japanese curry is also great for this.
However, make sure that the consistency of the store–bought or leftover curry isn’t too watery. Simmer the curry for a few minutes until it reaches the desired consistency – it should be thick enough to hold its shape.

Image credit: @petitlisblanc
The original kare pan is said to have originated from Cattlea, a bakery located in a small neighbourhood in Tokyo. In 1927, the owner came up with the idea of incorporating deep-frying and curry into bread. As these were considered western elements, the invention was initially named “yōshoku pan” (洋食パン; western bread).
Makes 6
Ingredients:
Curry filling
- 300g ground meat (a mix of beef and pork)
- 150g finely diced onion
- 1 piece of red chilli pepper, halved and deseeded
- ½ tsp cumin seed
- 1 tbsp cake flour
- Olive oil
Curry sauce
- ½ tsp salt
- 2 tbsp curry powder
- 1 tsp garam masala powder
- 30g ketchup
- 2 tbsp Worcestershire sauce
- ½ clove of garlic, grated
- 1 tbsp grated ginger
- 1 chicken stock cube
- 300ml water
Bread dough
- 150g bread flour
- 75g cake flour
- 18g cane sugar
- 4g salt
- 2g instant dry yeast
- 105g lukewarm water
- 37g beaten egg
- 15g unsalted butter, room temperature
For deep frying
- Beaten egg
- Panko bread crumbs
- Oil
Steps:
Curry sauce
- In a bowl, combine everything and ensure that it is mixed thoroughly. Set aside while you prepare the curry filling.
Curry filling
- Heat ~2 tbsp of olive oil in a frying pan over medium heat. Add cumin seeds and chilli pepper, then toast in the hot oil for 30 seconds.
- Once the aroma of the spices become more pronounced, add the finely diced onions and fry it over medium heat until soft. Remove the cooked onion mixture from the pan and set aside.
- Using the same pan, fry the minced meat over medium to high heat until lightly browned. Remove the excess oil with a paper towel and add the cooked onion mixture to the meat.
- Stir to distribute the onion evenly. Then, pour in the curry sauce and cook it over medium heat for 5 minutes. Make sure to stir while it is cooking.
- Once the mixture is bubbling, turn off the heat and add flour. Mix the mixture until the flour is fully incorporated and you no longer see dry lumps of flour.
- Turn the heat back on and cook the mixture over medium heat for another 5 minutes, or until it has thickened.
- Let it cool completely, then transfer to a bowl and cover with plastic wrap. Let it firm up in the fridge overnight.
Bread dough
- Combine bread flour, cake flour, instant dry yeast, and cane sugar in a bowl. Mix well.
- Add the beaten egg and ~⅔ of the lukewarm water – note that the temperature of the water should be ~40°C. Using a plastic bench scraper, roughly mix the dough.
- Add the remaining water little by little until there are no longer dry patches of flour and it forms a shaggy dough.
- Transfer the dough onto a clean surface. Press the dough to form a rough slab and sprinkle salt. Add the softened butter and gather the corners of the dough in the centre to encase the butter.
- Knead with your hands for 4-5 minutes, or until butter is thoroughly incorporated. Slap and fold the dough repeatedly against the countertop for 10 minutes, or until it is smooth and supple.
- Shape the dough into balls and place it in a lightly greased bowl. Cover with plastic wrap or a wet kitchen towel, and let it rise in a warm place for 40–60 minutes until it reaches 1½ to 2 times its original size.
- In the meantime, remove your curry mixture from the fridge and let it return to room temperature.
Assembly
- With a floured finger, poke a hole to check if the dough has risen sufficiently. If the hole springs back a little without filling back in completely, it is ready.
- Gently punch out the air and transfer to a lightly floured surface.
- Divide the dough equally into 6 portions. Flatten each portion and shape into a ball. Place the 6 dough balls on a baking tray, cover with a damp towel, and let it rest for 10 minutes.
- With a rolling pin, flatten each dough ball into a circle that is 9cm in diameter. Put 2–3 tbsp of curry filling in the centre.
- Gather the edges of the dough and fold in half. Pinch tightly to seal the seams well, then shape the dough lightly to form a rough oval shape.
- Set aside, with its seam side down and cover with a damp towel, while you assemble the rest.
- Once they are all filled, let it ferment in a warm place again for 20 minutes, or until it has risen slightly.
- Lightly dip the dough in a bowl of beaten egg, then coat with panko bread crumbs. Repeat for the rest.
- To deep fry the bread, heat a pot of oil to 160°C. Place 3 pieces of curry bread into the oil and fry for ~5 minutes, until both sides are golden brown.
- Place it on a wire rack or paper towel to drain excess oil. Let it cool slightly before serving.
Check out the original recipe here:
2. Melon pan (メロンパン)
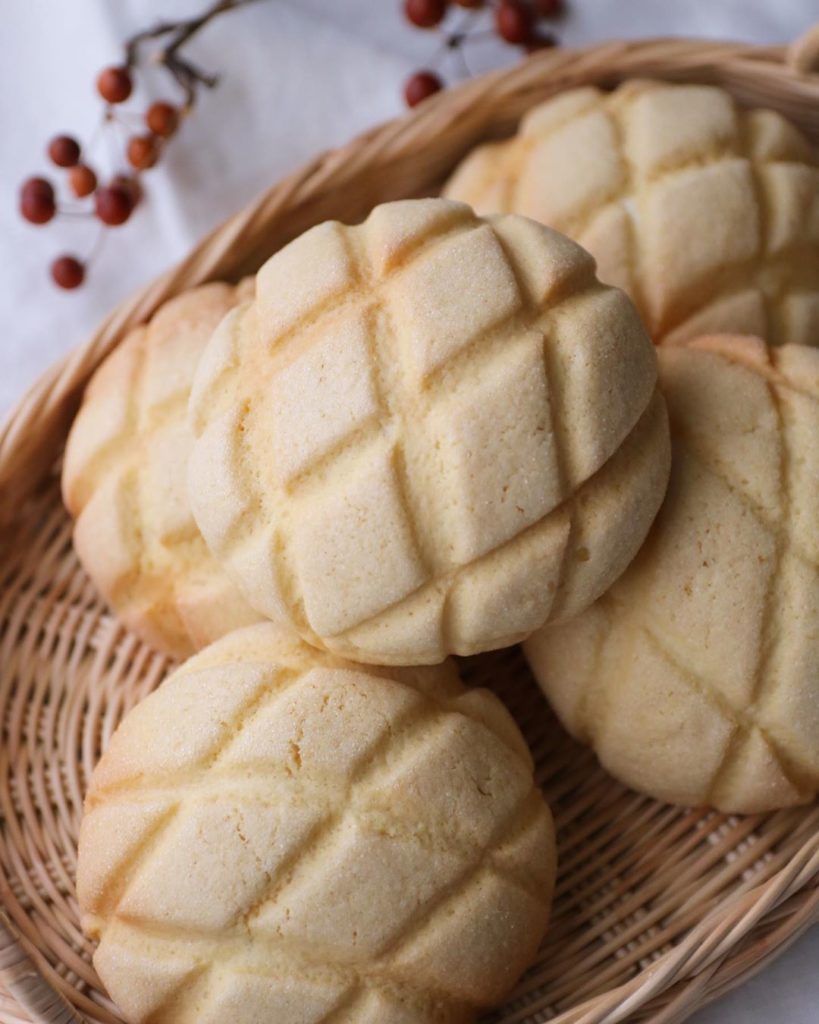
Image credit: @asako_ohana
Despite what its name might suggest, melon pan (メロンパン; meron pan) doesn’t contain actual melon. This Japanese bakery staple was named after the fruit as its appearance resembles the bumpy exterior of melons.
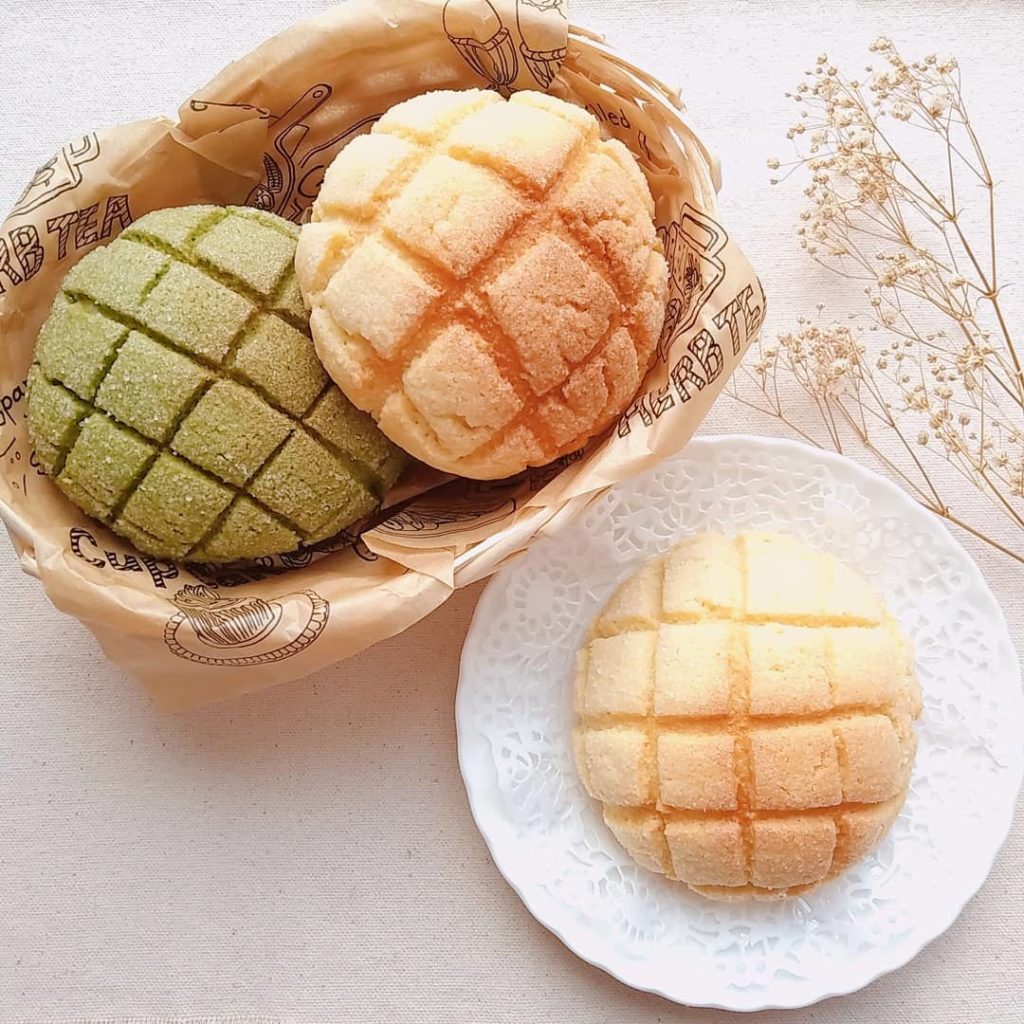
Image credit: @miyu12.5
The fluffy enriched dough is encased in a layer of crispy cookie crust and scored with criss-cross patterns to give it its signature look. These days, there are many bakeries in Japan that add melon purée or flavouring to the bread. Melon pan with flavours like chocolate and matcha are also offered in some places.
Makes 5
Ingredients:
Cookie dough
- 25g unsalted butter, room temperature
- 35g caster sugar
- 25g beaten egg
- 80g cake flour
- ¼ tsp baking powder
- Granulated sugar (for coating)
- Bread flour (for dusting)
Bread dough
- 140g bread flour
- 25g caster sugar
- ⅓ tsp salt
- 5g non-fat milk powder
- 3g instant yeast
- 1 tbsp beaten egg
- 70ml warm water
- 15g butter
- Bread flour (for dusting)
Steps:
Cookie dough
- Cream the butter and sugar until the mixture becomes pale yellow.
- Add the beaten egg bit by bit, making sure that it is fully incorporated after each addition.
- Add baking powder to the cake powder and thoroughly mix with a spatula. Then, sift the dry ingredients twice before adding ⅓ of it to the butter mixture.
- Lightly mix with a spatula and repeat until you’ve used up all the flour. Be careful not to overmix the dough.
- Transfer the cookie dough onto a sheet of cling film. Rub bread flour on your hands and shape the dough into a log. Wrap with the plastic film and let it set in the fridge for over 1 hour, or until it has firmed up.
Bread dough
- In a bowl, add bread flour, sugar, salt, milk powder and yeast. Use a whisk to combine the mixture thoroughly.
- Dilute the beaten egg with warm water and gradually pour it into the flour mixture, stirring with a spatula until evenly mixed.
- Using a bench scraper, transfer the dough onto a work surface and briefly knead it until it comes together.
- Slap the dough on the surface, fold it over itself, grab the edge furthest from you, and slap it again. If the dough is sticking onto the surface, gather using the bench scraper. Repeat the process until the dough becomes less sticky.
- Flatten the dough and spread butter on it. Gather the edges of the dough towards the centre and knead in the butter.
- Once the butter is fully incorporated, repeat the slapping and kneading process in step 4 for 10 minutes. You should end up with a smooth and glossy dough.
- Shape the dough into a ball and place in a lightly greased bowl. Let it sit in a warm place for 40 minutes.
- With a lightly floured finger, poke a hole in the centre of the dough – it should spring back slightly. If the hole disappears quickly, it is not ready – let it ferment for an additional 10– 20 minutes.
- Once it is ready, transfer to a lightly floured surface and flatten the dough to remove the air inside. Weigh and portion the dough into 5 equal pieces.
- Shape each piece into a ball and place them on a baking sheet that has been dusted with flour.
- Cover with plastic wrap and let them rest for 20 minutes at room temperature.
Assembly
- In the meantime, divide the cookie dough into 5 equal pieces. Put a bit of bread flour on your palms and shape each piece into a ball.
- Using a 9cm circle template lined with plastic wrap, place cookie dough and another sheet of plastic on top, then press down with a bench scraper.
- Transfer the prepared cookie dough to a lightly floured baking tray and let it firm up in the fridge. This will make it easier to handle.
- To form the melon pan, reshape each bread dough into a ball and drape a sheet of cookie dough over it. Pinch and hold the dough upside down, then coat the cookie exterior with granulated sugar.
- Lightly score a diamond criss-cross pattern on the surface of the cookie dough with a bench scraper.
- Place the melon pan on a baking tray lined with parchment paper and let them sit in a warm place for 40 minutes, or until they double in size.
- Bake the melon pan in a preheated oven for ~12 minutes at 170°C. When the tops become slightly golden brown, remove them from the oven and let them cool on a wire rack.
Check out the original recipe here:
3. Chocolate cornet (チョコレートコロネ)

Image credit: @yuka.rin5
Never without a chocolate cornet (チョコレートコロネ) in one hand, Konata from the popular anime series Lucky Star swears by this sweet pastry. These Japanese cornet-shaped breads are filled generously with rich chocolate custard.
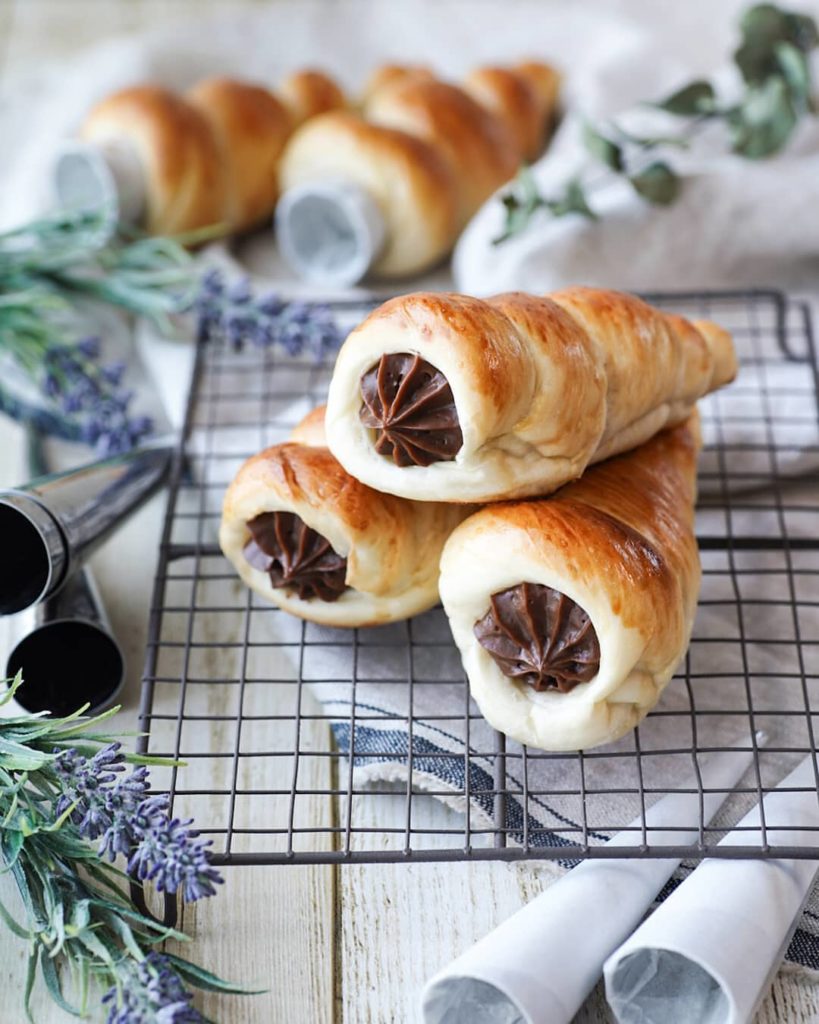
Image credit: @ayumibee_
According to the anime series, the best way to consume a chocolate cornet is to tear off small pieces from the thin end and dip it in the custard on the other end.
To achieve its signature shape, you’ll need special cone-shaped moulds. Don’t fret if you can’t find them; simply use kraft paper and aluminium foil to create makeshift cones.
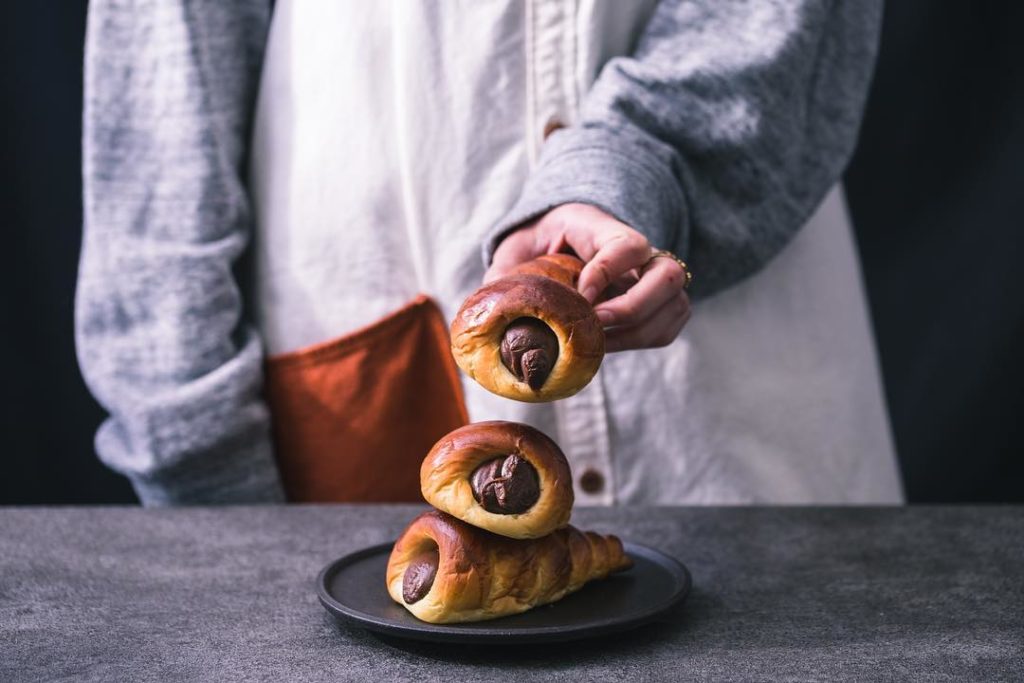
Image credit: @_kyosukeokuda_
Makes 6
Ingredients:
Bread dough
- 150g bread flour
- 1 tbsp raw sugar
- ½ tsp salt
- ½ tbsp non-fat milk powder
- 1 tsp instant dry yeast
- 1 tbsp lukewarm water
- 70ml water
- 1 tbsp beaten egg
- 15g butter
Chocolate custard
- 2 egg yolks
- 2½ tbsp granulated sugar
- 1 tbsp cake flour
- 1⅓ tsp cornstarch
- 1 tbsp cocoa powder
- 200ml milk
- 10g unsalted butter
- 30g chocolate
Assembly
- 1 tbsp beaten egg (for glazing)
- 6 cone-shaped moulds
Steps:
Chocolate custard
- In a pot, heat milk over medium heat and bring it to a simmer. Be careful not to boil the milk.
- Meanwhile, whisk together sugar and egg yolks in a bowl until it turns pale yellow and thick. Sift in cake flour, cornstarch, and cocoa powder. Whisk until there are no more dry patches.
- When the mixture is homogeneous, temper the mixture by adding hot milk gradually, making sure to mix well so that the eggs don’t scramble.
- Strain the mixture into a pot. Over low to medium heat, cook and whisk continuously until the mixture has thickened.
- Remove from heat, then add cold butter and chocolate pieces. Stir to combine well.
- Transfer the chocolate custard to a heatproof bowl. Cover with plastic wrap to prevent a skin from forming on the surface. Once it has cooled to room temperature, let it chill in the fridge for a few hours or overnight.
Bread dough
- Dissolve the yeast in lukewarm water by letting it sit for 5 minutes.
- Combine and mix sugar, salt, milk powder, and bread flour together in a bowl.
- Add the dissolved yeast to the flour mixture. Combine beaten egg and water, and gradually add to the flour mixture while mixing.
- Once the dough comes together, transfer it to a food processor. Mix for ~30 seconds until the dough forms a ball.
- Flatten the dough with lightly floured fingers and smear butter onto the dough. Mix for ~15 seconds, then gather the dough pieces and mix for another 15 seconds.
- Remove the dough and shape it into a ball until the surface becomes smooth.
- Place the dough in a bowl and cover with plastic wrap. Let it rise in a warm place for ~1 hour, or until the dough has doubled in size.
- To check if the dough has risen sufficiently, poke a hole in the centre with a lightly floured finger. If the hole springs back quickly, it needs to rise more.
- Place the dough on a surface that has been dusted with bread flour. Flatten the dough with your hands to remove the gas inside.
- Weigh and divide the dough evenly into 6 pieces, then shape them into balls by gathering the edges at the bottom.
- Tightly pinch the bottom and set them aside on a floured surface. Cover with a damp kitchen towel and let them rest for ~15 minutes.
- To shape the dough into cornet shapes, lightly grease the cone-shaped moulds with butter.
- Flatten the dough ball, then roll it into a rope that measures ~30–35cm long. Take note that you will have to make one end thinner than the other.
- Starting from 2cm below the tip of the mould, coil the dough around it. Pinch the ends tightly together.
- With the ends facing down, gently press the dough onto a baking tray lined with parchment paper. Cover with plastic wrap and proof in a warm place again until it has risen to 1½ times its original size.
- With a pastry brush, brush the surface of the dough with beaten egg.
- Bake in a preheated oven at 200°C for ~10–12 minutes. The bread is done when its surface turns golden brown.
- Transfer the bread from the baking tray and let it cool on a wire rack for 2–3 minutes before removing the moulds and letting it cool completely.
Assembly
- To assemble, lightly mix the chilled chocolate custard to make it silky again. Transfer to a piping bag.
- Fill the breads with the chocolate custard. You can serve them immediately or let them chill in the fridge first.
Check out the original recipe here:
4. Shio pan (塩パン)
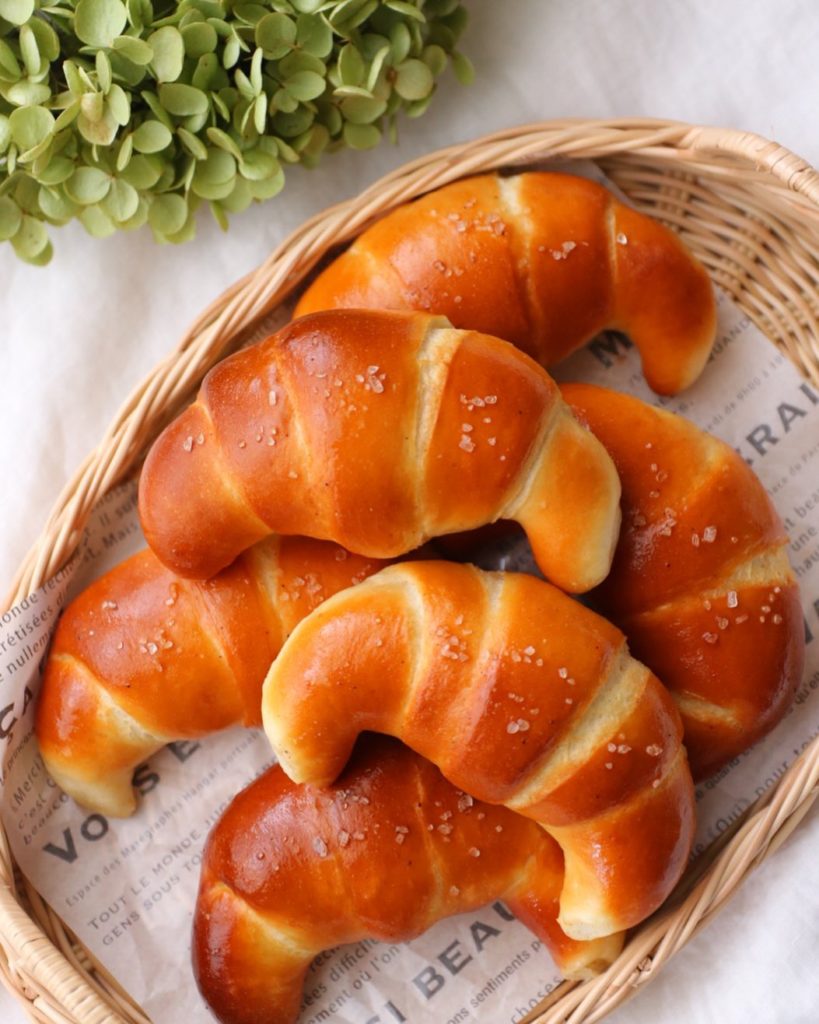
Image credit: @asako_ohana
Shaped like the iconic French croissant but nowhere as difficult or labour intensive to make, shio pan (塩パン) is a quick and fuss-free fix for when you’re craving for a buttery snack.
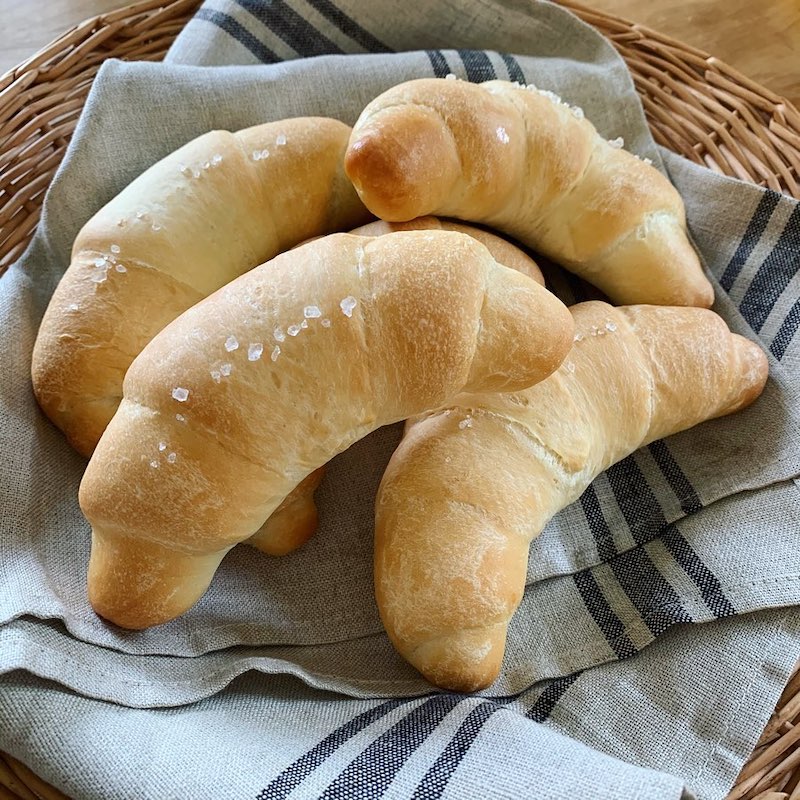
Image credit: @furusatonote
This salty and buttery moon-shaped bread was all the rage in Japan a few years back. It’s easy to see why – the lightly salted crust and chewy interior with a buttery filling makes for a moreish treat. Enjoy these buns while they are still warm as they taste best when they’re fresh out of the oven.
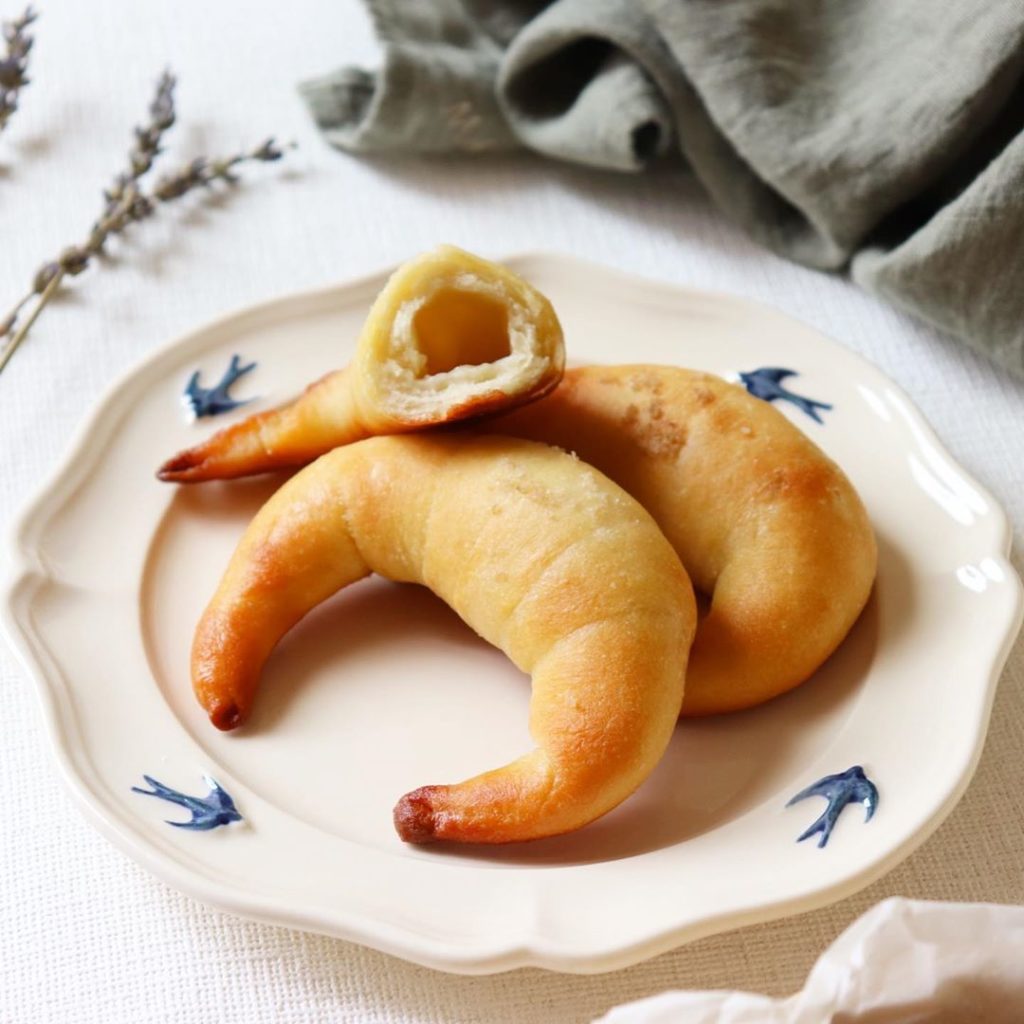
Image credit: @shocolate.0127
Makes 8
Ingredients:
Bread dough
- 200g bread flour
- 50g pastry flour
- 12g sugar
- 4g salt
- 65g milk
- 100g lukewarm water
- 4g instant dry yeast
Assembly
- 30g milk
- Coarse or flaky sea salt
- 40g cold salted butter, cut into 8 pieces
Steps:
- Dissolve yeast in a cup of lukewarm water. In a bowl, combine bread flour, pastry flour, sugar, and salt.
- Add milk and yeast mixture. Mix with a spatula, then switch to your hands and knead the mixture until a shaggy dough is formed.
- Cover and let it rise at room temperature for ~1 hour, or until doubled in size.
- Sandwich the cold butter between two sheets of plastic wrap. Flatten with a rolling pin and shape into a rectangle. Score and divide it into 8 strips, then store in the fridge until needed.
- Transfer the dough onto a floured surface and shape it into a circle. Using a bench scraper, cut the dough into 8 equal triangular pieces. Place the dough pieces on a baking sheet and let them rest, covered, for ~10–15 minutes.
- Take a piece of dough triangle and flatten with a rolling pin. Place the cold salted butter piece lengthwise at the wider end of the dough. Roll from the base to the tip as evenly as possible, making sure that the butter is properly encased.
- Place the crescent rolls onto a baking tray lined with parchment paper, tip side facing up. Repeat until you have used up the remaining dough.
- Cover and let it rise for ~1 hour at room temperature, or until it has doubled in size.
- Once they are ready, brush the surface with milk and sprinkle flaky sea salt.
- Bake in an oven that has been preheated to 220°C for 15–20 minutes. Let cool for a while and serve warm.
Check out the original recipe here:
5. Shokupan (食パン)
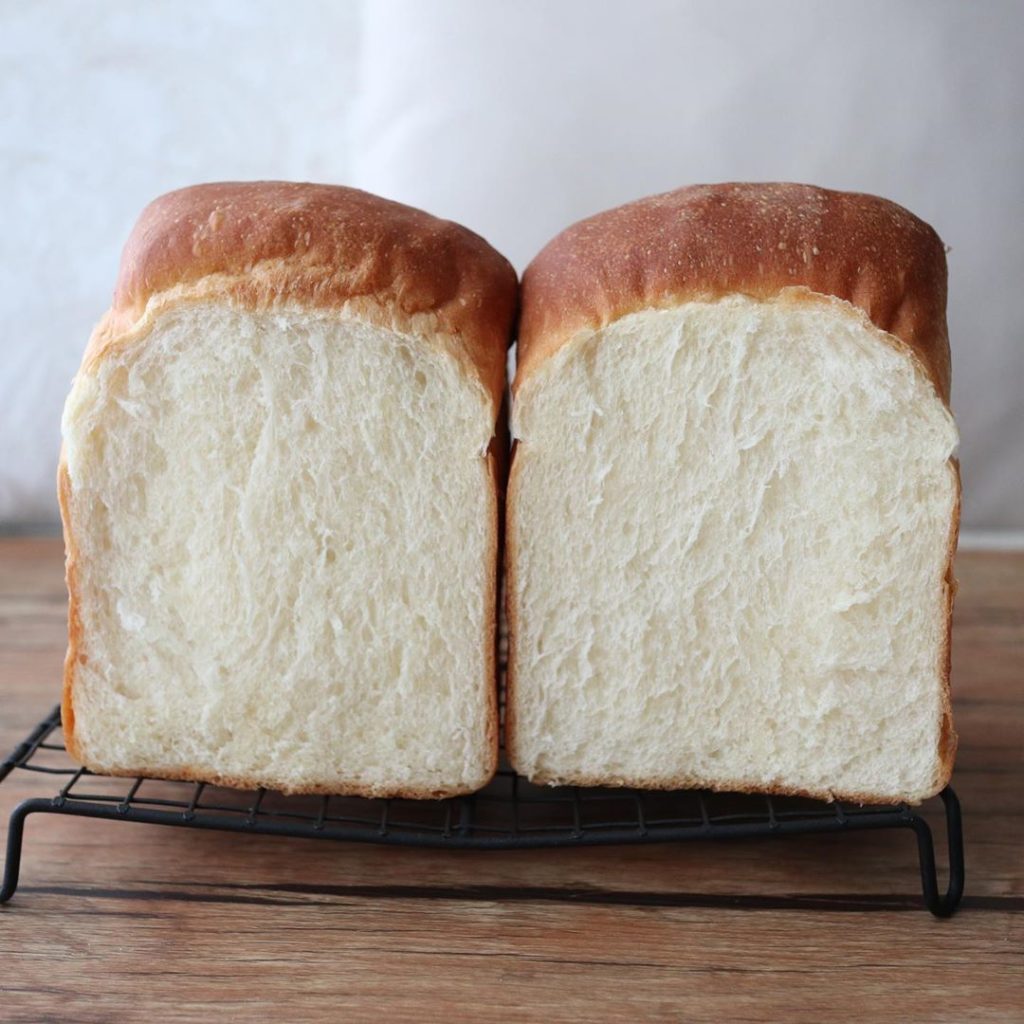
Image credit: @m_pane_inizio
If you’re one of those people who have turned to baking as a stress reliever during quarantine, you’d have likely come across countless video recipes for Hokkaido milk bread. Well, shokupan (食パン) may be the viral milk bread’s lesser–known cousin on the internet, but it has steadily become a local favourite in recent years.
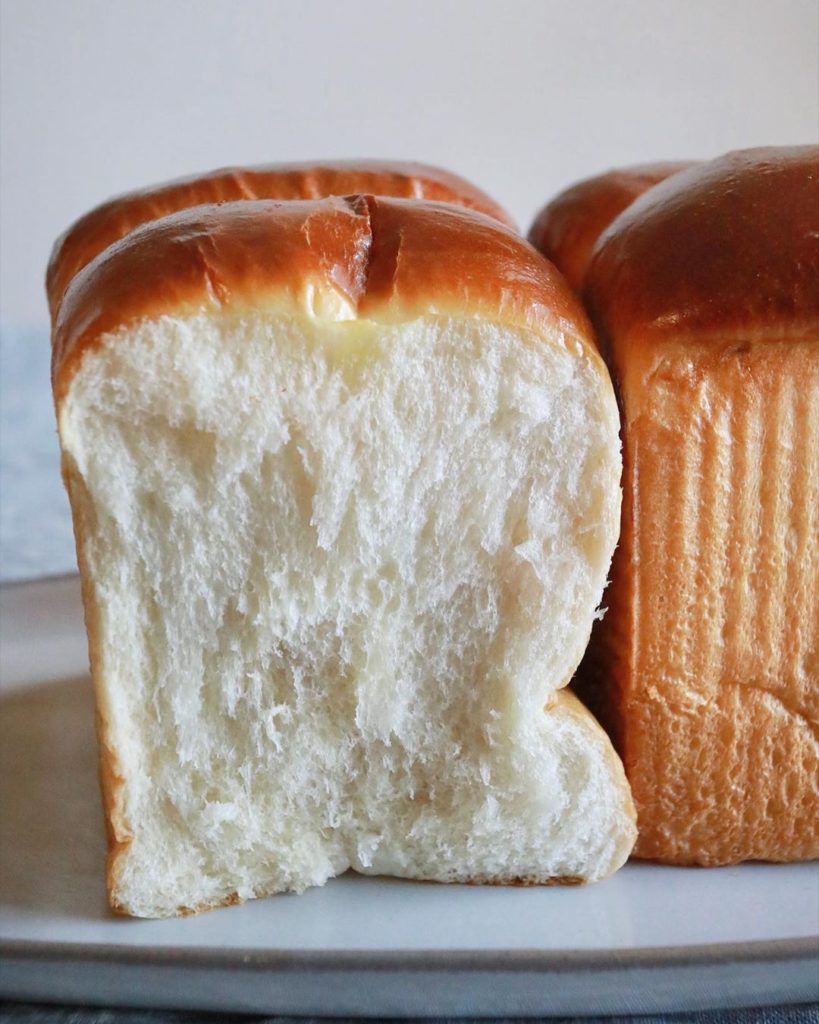
Image credit: @breaday_everyday
Shokupan is essentially Japanese white bread with a soft and moist interior that is chewier than your average loaf. It is the perfect accompaniment to sweet spreads like fruit jam or nutella, or simply a slab of butter.
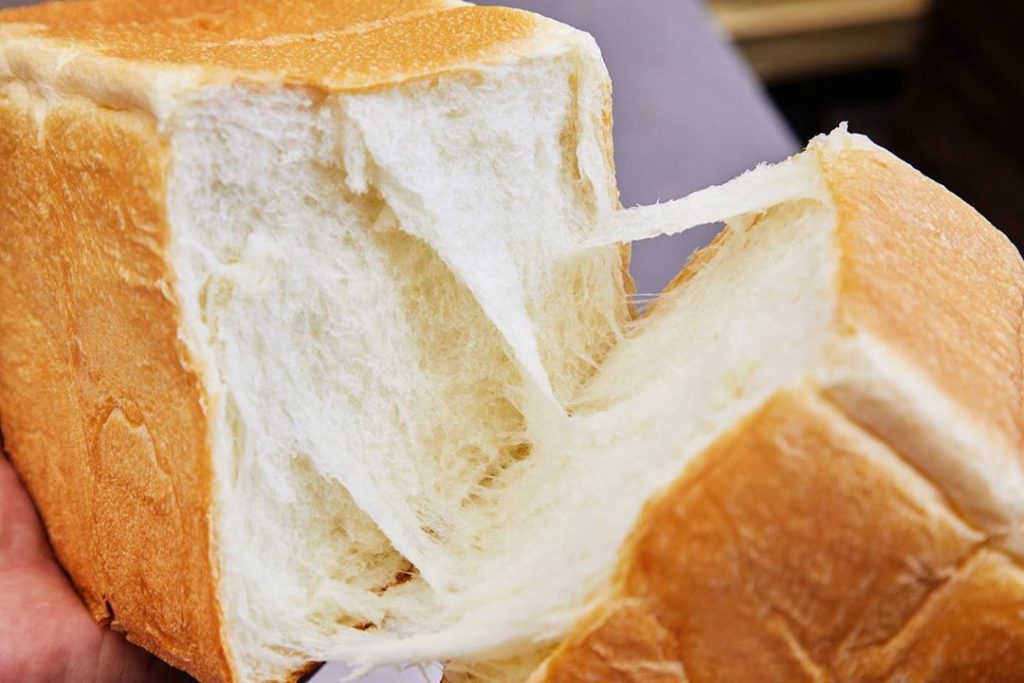
Image credit: @bakery_kawa
Makes 1 loaf (15cm x 20cm x 10cm)
Ingredients:
- 270g bread flour
- 20g honey
- 5g salt
- 4g instant dry yeast
- 160ml milk
- 50ml boiling water
- 20 unsalted butter
Steps:
- Add flour, honey, salt, and yeast to a rectangular Tupperware container with long sides. Add boiling water to the milk, stir, and pour the wet mixture into the container.
- Using a bench scraper, mix thoroughly until there are no more dry patches of flour. Spread the dough in the container, cover with a lid, and let it rest for 30 minutes.
- Mix softened butter with the dough using the bench scraper. The butter will gradually be incorporated as you mix and cut the dough. You can stop mixing when the surface of the dough is smooth and no longer greasy.
- Gather the dough towards the centre, cover the container with a lid, and let it rest for 1 hour.
- When the dough has doubled in size, transfer it from the container to a floured surface. Dust the surface of the dough with flour, flatten it, and fold in thirds.
- Now, with the width of the dough facing you and seam side up, roll the dough away from you.
- Tuck and pinch the bottom to form a ball. Return the dough ball to the container, cover, and let it rest until it doubles in size.
- When the dough has fully risen, transfer it to a floured surface. Press the dough to remove excess gas, then weigh and divide it into 2 equal portions.
- Fold each dough piece in thirds and roll it to approximately 20cm in length and 15cm in width. Make sure to press out any big air pockets left in the dough.
- To shape the dough, fold in thirds lengthwise, then repeat step 6. Repeat for the other piece of dough.
- Place the dough, seam side down, and against the side of the width of a tall bread tin. Leave a gap in the middle. Cover with the lid and let it rest until the dough rises to 1cm below the top.
- Bake in an oven that has been preheated to 170°C for 25 minutes.
- Once it is done, slam the tin against the table and tap on all sides to release the bread from the mould. Remove bread gently and let it cool on a wire rack.
Check out the original recipe here:
6. Yakisoba pan (焼きそばパン)
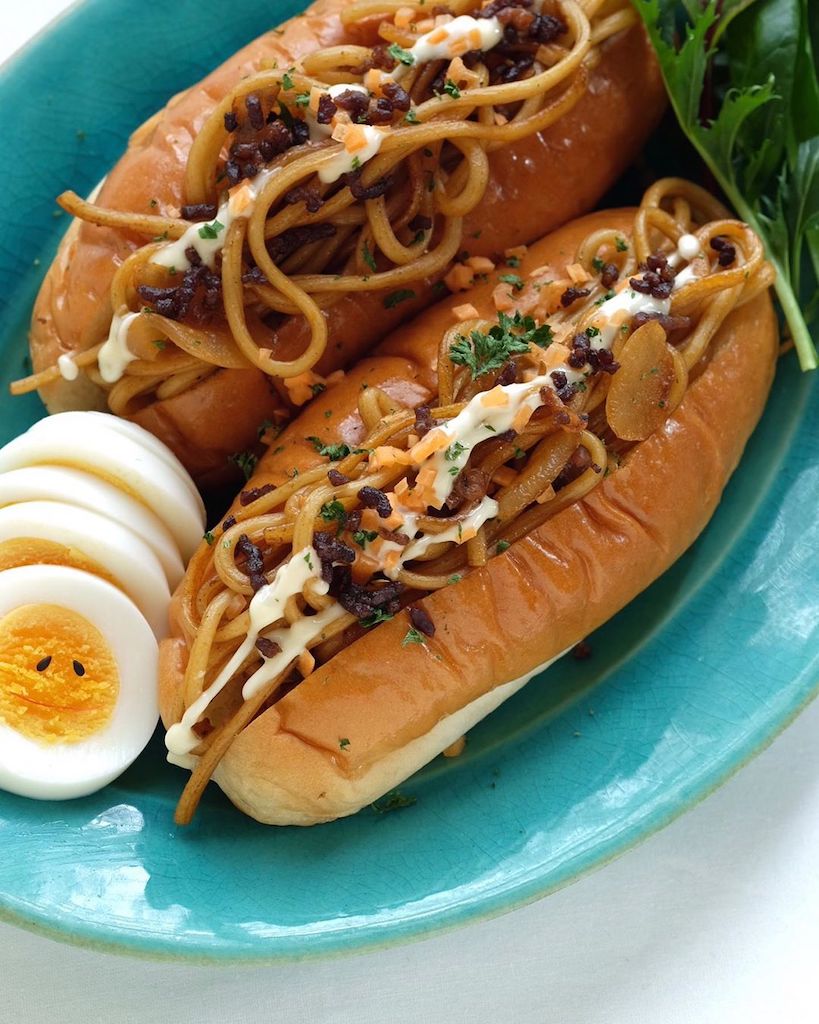
Image credit: @match_guy_nice
Available all over Japan in bakeries, convenience stores, and supermarkets, yakisoba pan (焼きそばパン) is the bread for carb lovers.
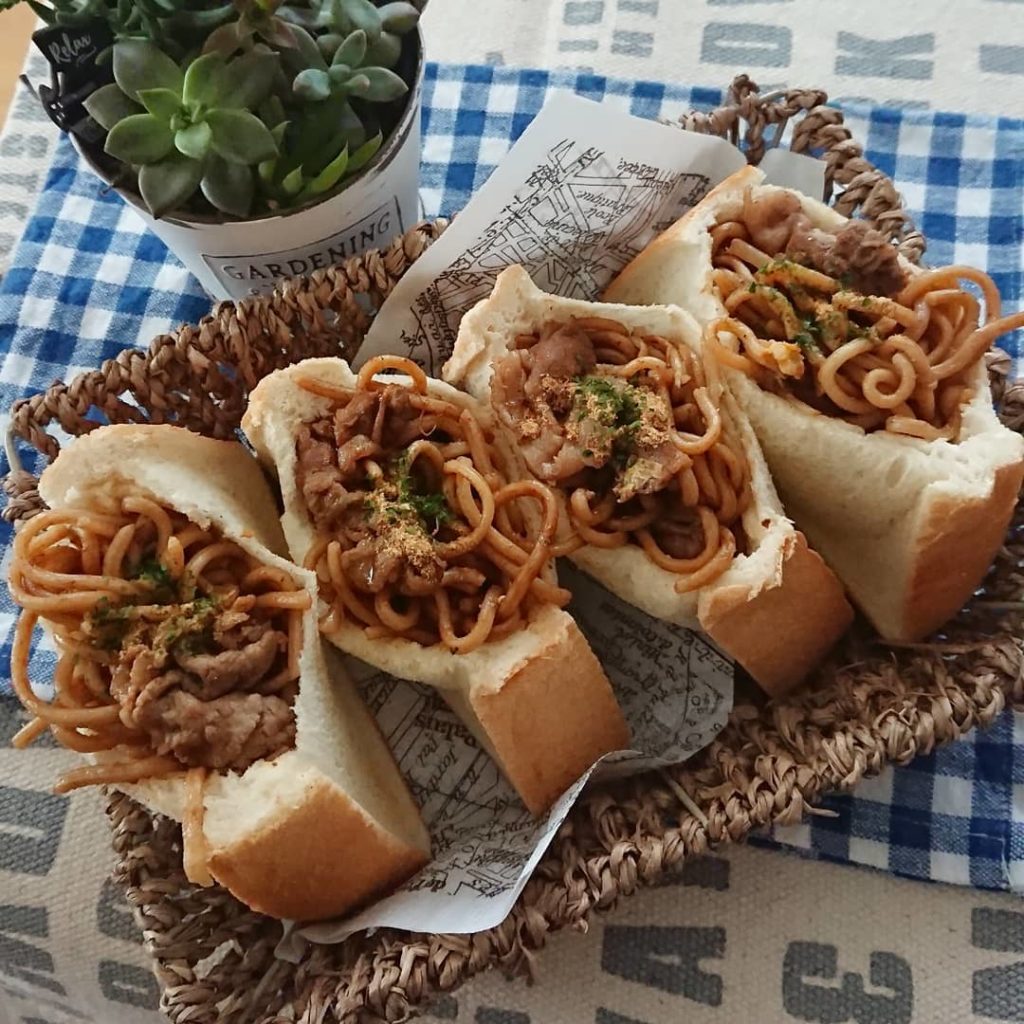
Image credit: @mune__hiro
This bakery staple consists of Japanese seasoned stir-fry noodles sandwiched between koppe pan (コッペパン) – Japan’s lighter and softer take on hot dog buns.
The pairing might sound unusual, but they complement each other surprisingly well. Just be prepared for a wave of fatigue to hit you after you finish one, thanks to the amount of carbs in one serving. Do note that this recipe calls for a stand mixer, but you can knead the dough by hand too.
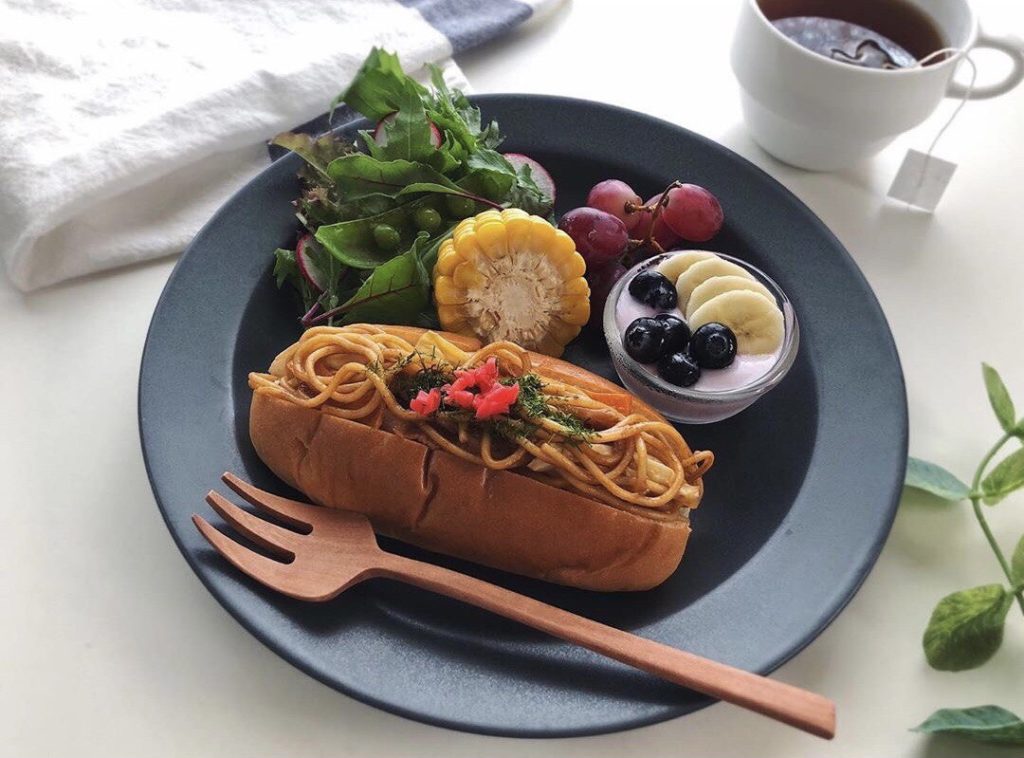
Image credit: @yoshimi_t418
Makes 6
Ingredients:
Koppe pan
- 200ml milk, lukewarm
- 5g active dry yeast
- 30g sugar
- 240g bread flour
- 60g cake flour
- 5g salt
- 10g milk powder
- 30g unsalted butter, room temperature
- Egg wash (1 beaten egg + a pinch of salt)
Yakisoba
-
- 90g cabbage, thinly sliced
- 1 tbsp oil
- 4 tbsp water
- 2 packets of chuka men (Chinese style noodles)
- Salt and pepper
- 4 tbsp store-bought or homemade yakisoba sauce
- Aonori (dried green laver)
- Benishoga (red pickled ginger)
Homemade yakisoba sauce (optional)
- 3 tbsp tonkatsu sauce
- 2 tbsp Worcestershire sauce
- ½ tbsp soy sauce
- ½ tbsp mirin
Steps:
Koppe pan
- In a stand mixer bowl, pour in lukewarm water. Sprinkle sugar and yeast over the surface, then whisk well. Set it aside for 5 minutes.
- Combine bread flour and cake flour in another bowl, then add to the milk mixture. Add salt and milk powder. Using a dough hook attachment, start kneading at medium speed.
- After ~8 minutes, the dough should come together to form a ball. Add in softened butter and knead for another 4–5 minutes, or until the butter is completely incorporated.
- Cover the bowl with plastic wrap and leave it in a warm place to rise for ~1 hour.
- After it has doubled in size, punch the dough to deflate it. Transfer to a cutting board and cut into 6 equal pieces. Each piece should weigh ~70g.
- Flatten and fold the dough in thirds. Rotate and fold in thirds again. Repeat the folding one more time.
- Repeat step 6 for the remaining dough, then let them rest for 15 minutes, covered.
- Roll out the dough with a rolling pin, to ~10cm in width and 18cm in length. Fold one side of the dough to the middle lengthwise and press along the seams to adhere. Do the same for the other side.
- Then, fold the dough in half, lengthwise, and press the long edges together to form a long log. Pinch the ends together and place the dough seam side down on a baking tray lined with parchment paper.
- Once you are done with the rest of the dough, brush the surface with egg wash and let them rise again for 1 hour, or until doubled in size.
- Bake in an oven that has been preheated to 250°C for 9–10 minutes.
Yakisoba
- To make yakisoba sauce, combine and mix tonkatsu sauce, Worcestershire sauce, soy sauce, and mirin. Set aside.
- In a large frying pan, heat oil over medium-high heat. Once the oil is hot, add cabbage and stir–fry until it has taken on some colour. Lower the heat, then add noodles and water. Cover with a lid for 2 minutes to let the noodles soften.
- When the noodles become soft, use a pair of chopsticks to loosen the noodles. Toss it around with the cabbage.
- Season with salt and pepper accordingly, then add yakisoba sauce and toss again to distribute the sauce evenly. Stir–fry for a couple of minutes.
Assembly
- To assemble, make a slit in the middle of each koppe pan without cutting all the way through. Stuff the noodles in the bread, then top with aonori and benishoga. Serve warm.
Yakisoba recipe here and koppe pan recipe here.
7. Anpan (アンパン)
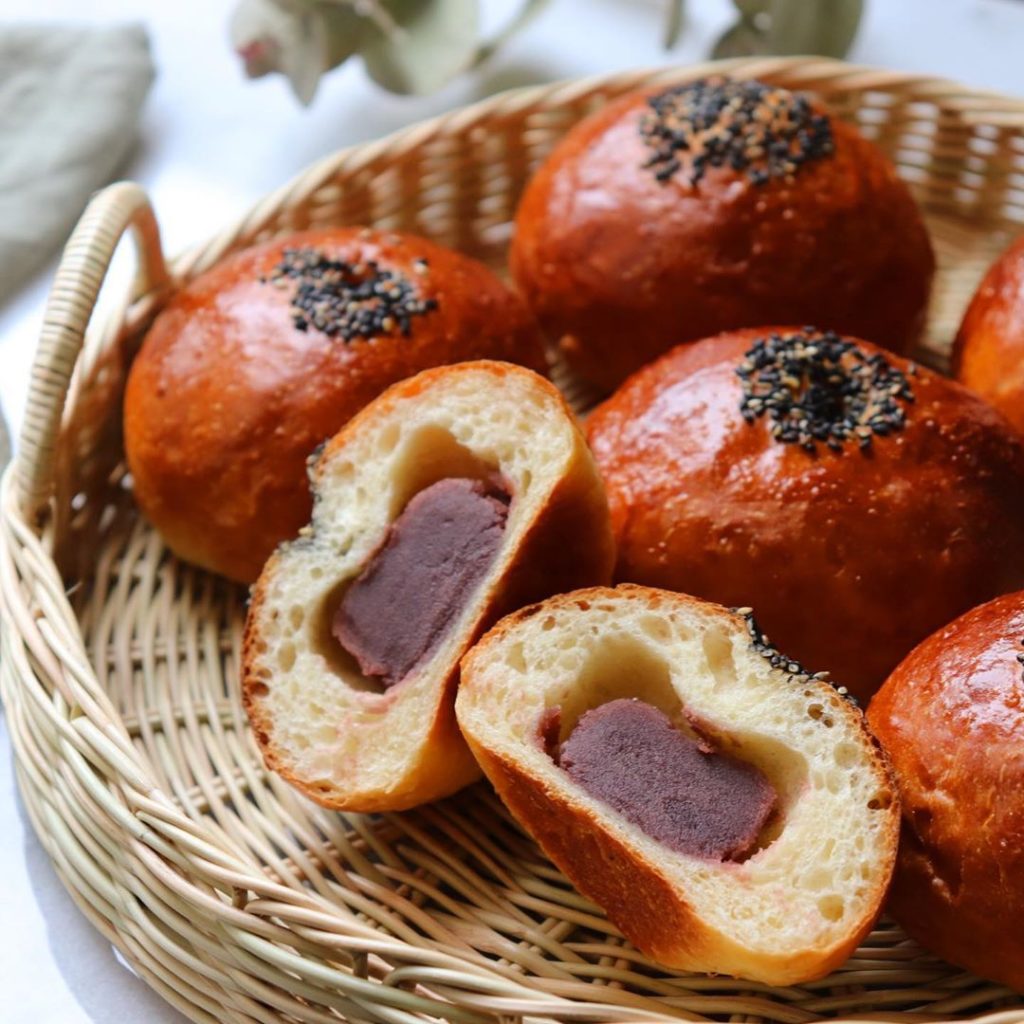
Image credit: @shocolate.0127
Chances are, most of us had our first introduction to anpan (餡パン) through the wildly popular Japanese superhero, Anpanman. His head is made of anpan, a type of traditional Japanese sweet bread that is filled with red bean paste.
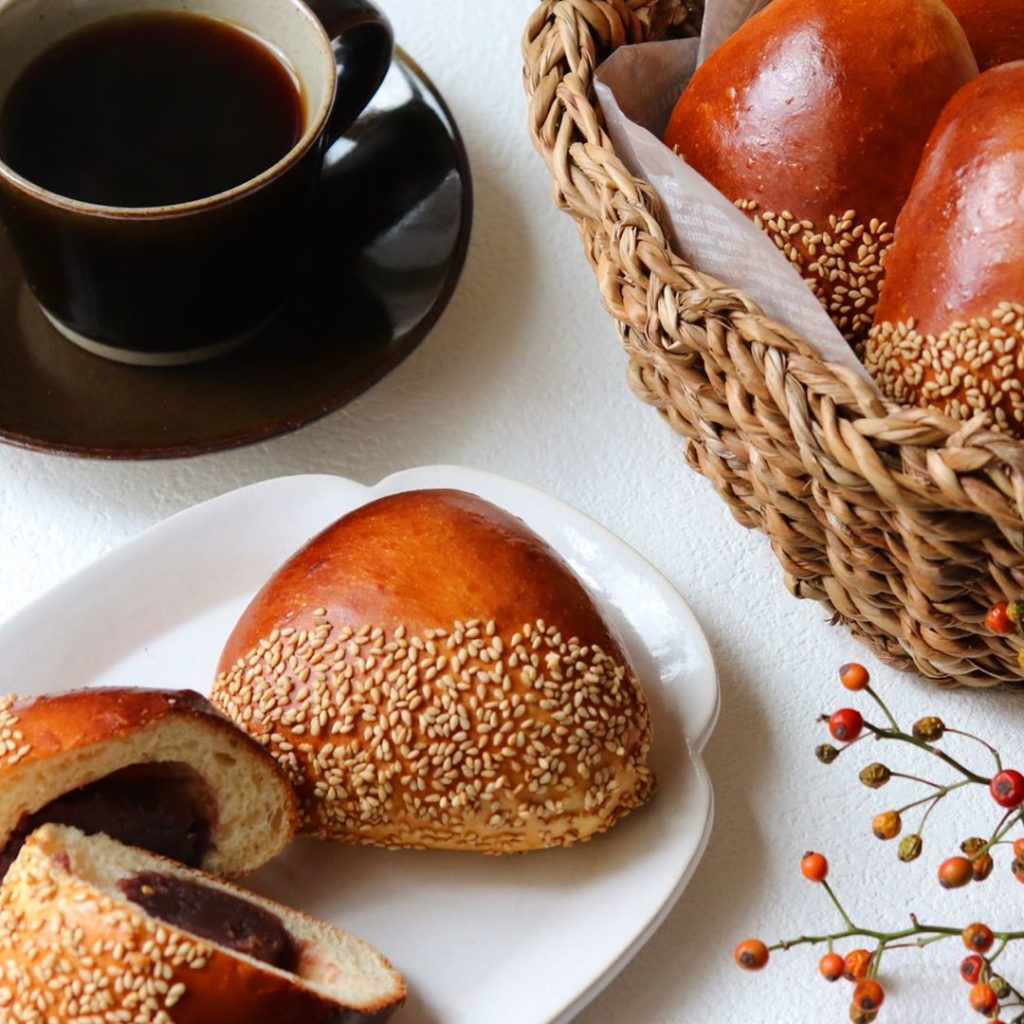
Image credit: @shocolate.0127
The classic bread is a national favourite for a reason – the thick red bean filling contrasts nicely with the fluffy bread. It’s the perfect afternoon snack when paired with a cup of tea. These days, you can find also buns with fillings such as chestnut, black sesame, white beans, and green beans.

Anpanman-themed anpan.
Image credit: @fleur.de.pain.ayano
Makes 8
Ingredients:
Bread dough
- 225g bread flour
- 25g cake flour
- 50g sugar
- 4g salt
- 3g instant dry yeast
- 1 large egg, beaten
- 50ml milk
- 50ml water
- 25g unsalted butter, softened
Assembly
- 280g red bean paste
- Egg wash (1 beaten egg + 2 tbsp water)
- 2 tsp toasted black sesame seeds
Steps:
Bread dough
- In a large bowl, combine cake and bread flour, sugar, salt, and yeast.
- Make sure that your milk and water are kept at 30°C. Add a beaten egg, then milk and water, into the bowl of dry ingredients.
- Using your hands or a wooden spoon, mix the ingredients until they are combined. Keep mixing until it forms a shaggy dough.
- Transfer the dough onto a lightly floured surface and knead for 5 minutes. If the dough is too sticky, lightly dust your hands with some bread flour.
- When the dough becomes more elastic, flatten it and add softened butter. Encase the butter in the dough, then continue the kneading process. With the addition of butter, the dough will become oily and start to stick to the surface. Use a bench scraper to scrape any dough stuck onto the table.
- When the dough becomes smooth and the surface is no longer greasy, hold one edge of the dough and slap it against the countertop. Fold it over itself, press the dough, and repeat the process. Continue for 10 minutes, or until the dough becomes smooth and supple.
- To check if the dough is ready, do the windowpane test. Take a piece of dough and slowly stretch it into a thin translucent membrane. If you are able to do so without the dough tearing, it is ready. If not, knead the dough for another 2 minutes and test again.
- Shape the dough into a ball and let it rest in a covered bowl for 1–2 hours, or until it has doubled in size.
- Poke a hole in the centre with a lightly floured finger – it should spring back slightly without closing completely. Place the dough on the work surface and press to release the gas.
- Fold both sides of the dough towards the centre, then fold in thirds with the seam side facing up. Shape the dough into a ball.
- Divide the dough into 8 equal portions and form each piece into a ball. Let the dough balls rest, covered, for 15 minutes at room temperature.
- After resting, flatten the dough and repeat step 10. Press the dough so it stretches to 8cm in diameter, then spoon 35g of red bean paste in the middle of the dough.
- Carefully wrap the red bean paste by pulling all sides of the dough, then pinch the seams tightly. Place the balls on a baking tray lined with parchment paper, with seams facing down.
- Let the dough rise in a warm place for ~30 minutes, covered, until they have doubled in size. Meanwhile, preheat your oven to 200°C.
- Once they are done proofing, lightly brush the dough balls with a layer of egg wash and sprinkle black sesame seeds on top.
- Bake at 200°C for 13–15 minutes until they turn golden brown. Transfer to a wire rack to cool completely. Serve.
Check out the original recipe here:
8. Cream pan (クリームパン)
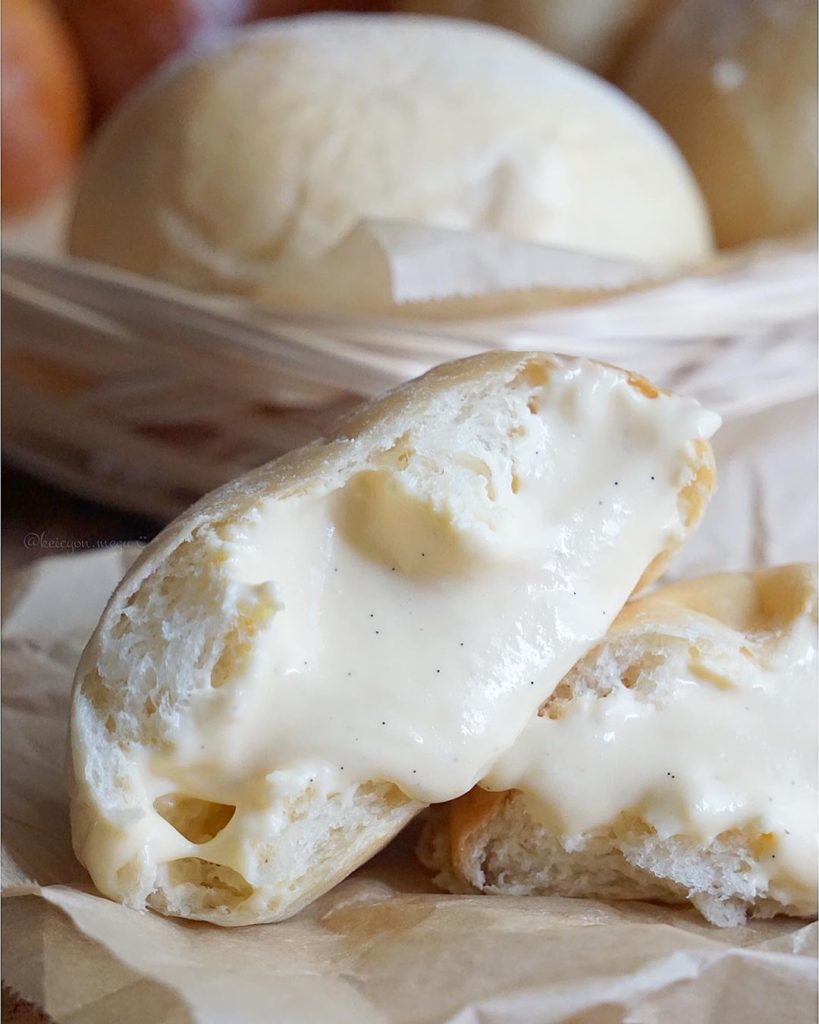
Image credit: @keicyon.megu
If you’re not a fan of red bean, try cream pan (クリームパン) instead. Traditionally, thick custard cream is wrapped in bread dough, then baked together. However, most recipes or cream pans these days call for the bread to be baked first before being filled with custard.
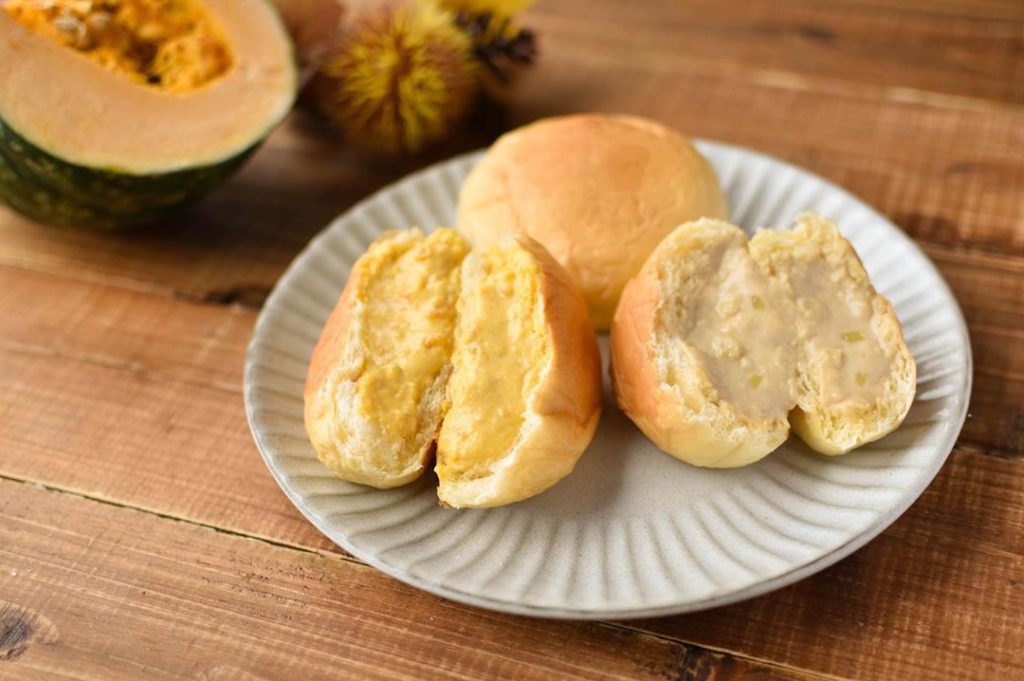
Image credit: @hattendo_official
This method is great for people who prefer their custard runnier and creamier. Vary the amount of whipped cream used to adjust the taste and consistency of the custard. Tear into the bread and you’ll find it overflowing with rich milky custard. Fancier cream pans will even have fillings dotted with specks of vanilla bean.
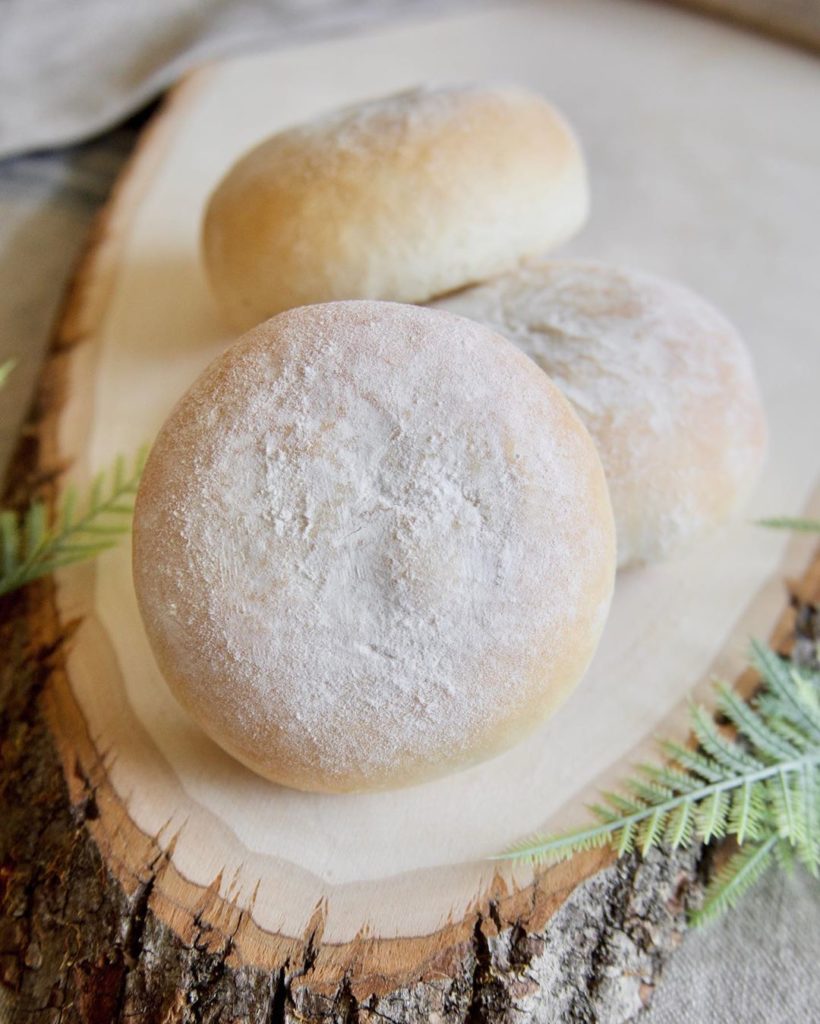
Image credit: @breaday_everyday
Makes 8
Ingredients:
Custard
- 2 egg yolks
- 30g granulated sugar
- 18g cornstarch
- 180g milk
- Vanilla extract or vanilla bean paste
Bread dough
- 150g bread flour
- 12g sugar
- 2g salt
- 6g non–fat milk powder
- 75g water, lukewarm
- 2g dry yeast
- 18g beaten egg
- 15g unsalted butter, softened
- Egg wash (15g beaten egg + ½ tsp water)
Steps:
Custard
- In a heatproof bowl, cream egg yolks and sugar together until the mixture has turned pale yellow and is no longer gritty.
- Sift in cornstarch and whisk to combine. Pour milk into the mixture and whisk to combine thoroughly.
- Cook in a microwave (600W) on medium heat for 1 minute. Whisk to distribute the heat well, then cook again for 1½ minutes. Mix well. The consistency should be thick but not too stiff.
- Mix in a few drops of vanilla extract or 1 tsp of vanilla bean extract.
- Transfer to a container and let it cool. Cover with plastic wrap and make sure that the film is touching the custard – this is to prevent a skin from forming on the surface.
- Once it has cooled down completely, place it in the fridge to chill.
Bread dough
- Stir yeast into lukewarm water until it completely dissolves.
- In a large bowl, add and combine bread flour, sugar, salt, and milk powder. Pour in the dissolved yeast mixture and beaten egg. Mix with a spatula until there are no big lumps of dry ingredients.
- Transfer to a work surface and knead – pull the dough away from you and fold it over itself. Repeat the motion for 10 minutes, or until the dough becomes smooth.
- Flatten the dough and add butter. To incorporate the butter, use a bench scraper to cut the dough into a few strips and knead to bring the pieces together again. It should take ~5 minutes of kneading before it passes the windowpane test.
- Shape the dough into a ball and let it rest in a lightly oiled bowl, covered, for 30–40 minutes or until it doubles in size.
- Invert the bowl onto your work surface and lightly tap to release the dough. Flatten the dough to degas and form into a circle. Cut and divide it into 8 equal slices, then roll each piece into a ball.
- Once portioned and rolled into balls, cover them with a wet cloth and rest for 15 minutes.
- After 15 minutes, press to deflate the dough balls, then shape them again into spheres. Repeat for the remaining dough and place them on a baking tray lined with parchment paper. Set aside in a warm place for 30–40 minutes – they will rise and double in size.
- Meanwhile, preheat your oven to 190°C.
- When the dough balls are done rising, gently brush them with a layer of egg wash. Bake for 10–12 minutes, then cool on a wire rack.
Assembly
- To assemble, transfer the chilled custard to a bowl and whisk to loosen. Transfer to a piping bag with a round tip.
- Using a chopstick, poke the side of the buns and wriggle around to create space for the custard.
- Pipe the buns with custard – you should be able to feel the bun expand slightly in your hand – and stop before the custard oozes out.
- Serve immediately or store in the fridge until consumption.
Check out the original recipe here:
9. Agepan (揚げパン)
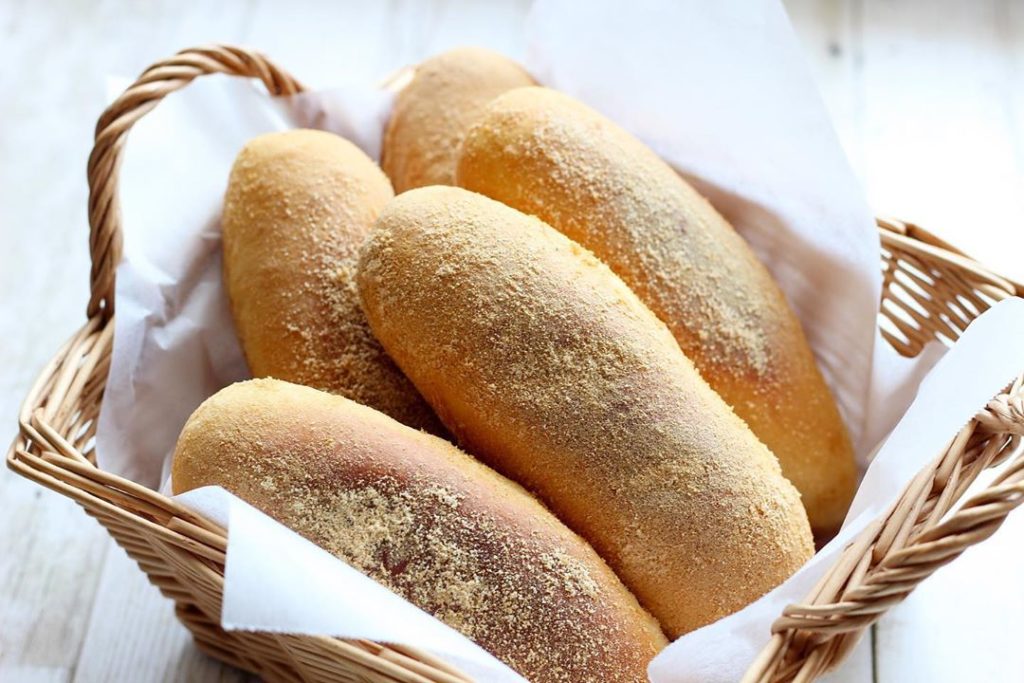
Image credit: @mugi_mama
Agepan (揚げパン) is Japan’s take on sugar doughnuts and a zhuzhed–up version of koppe pan, the same bread that is used for yakisoba pan.
The sweet bread is often deep-fried – “age” means “to fry” – and coated liberally with a mixture of sugar and kinako (roasted soybean powder). Other flavoured powders, such as matcha or cocoa powder, are excellent substitutes if you can’t find kinako.
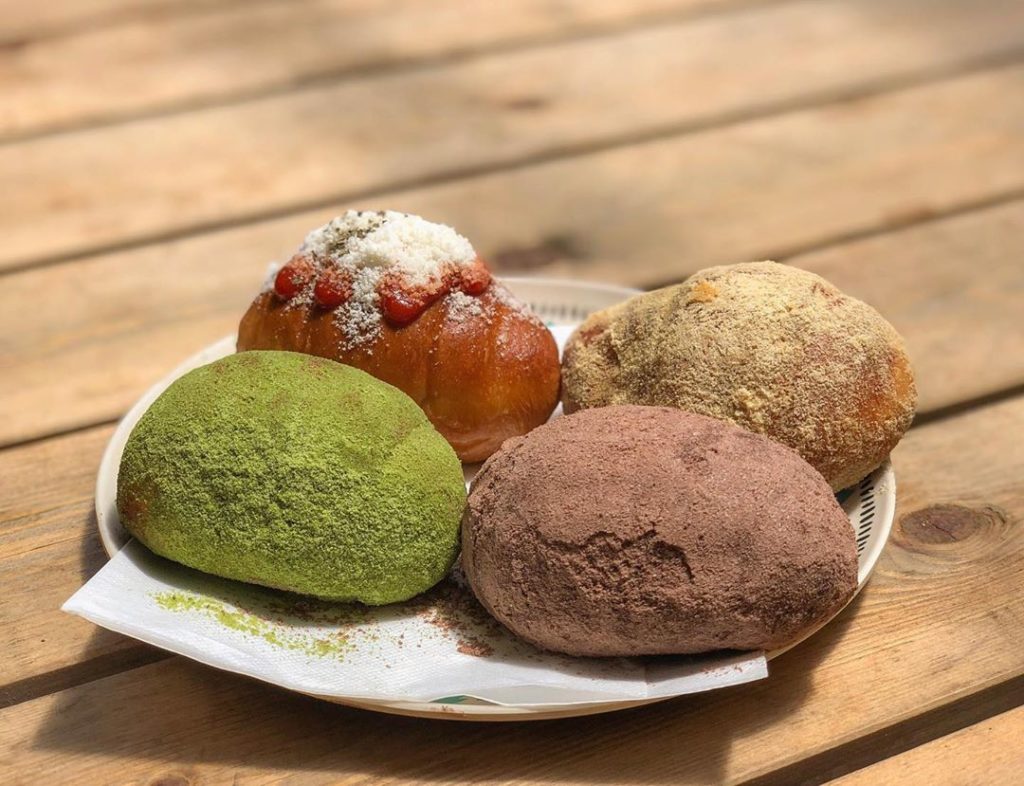
Image credit: @iihaanaaeeii
For a fuss-free experience, we recommend getting your hands on some koppe pan. In a pinch, you can substitute with hot dog buns as well. But if you’d like to make everything from scratch, check out the koppe pan recipe under our yakisoba pan entry.
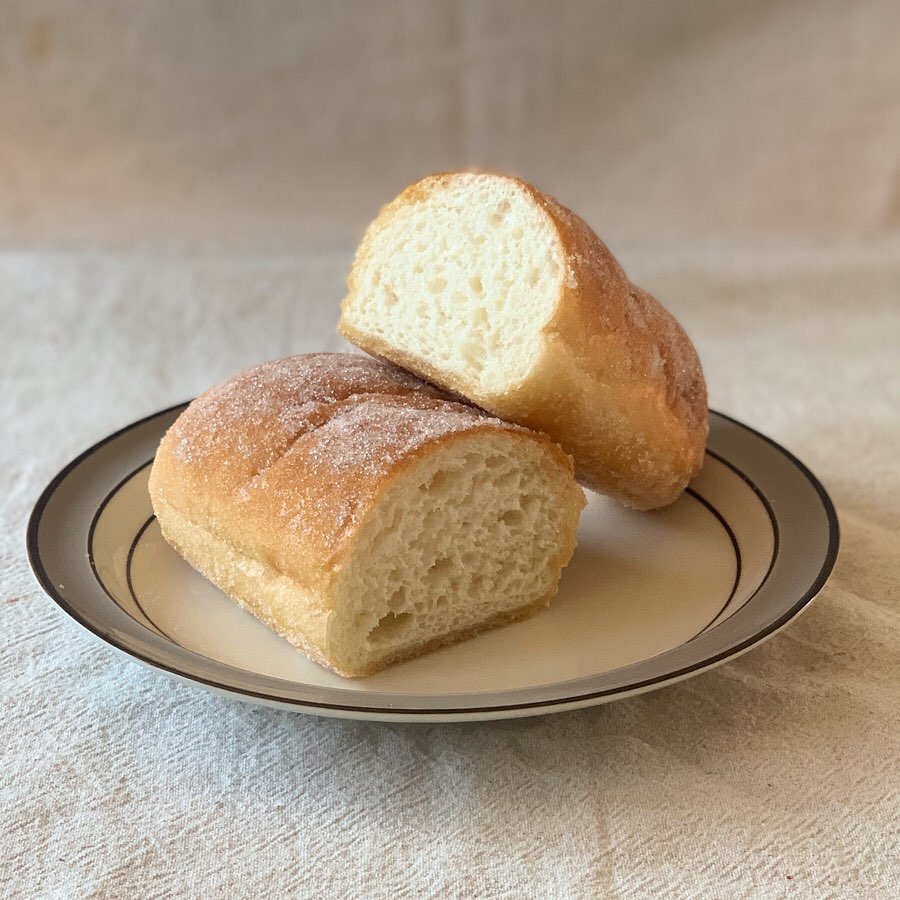
Image credit: @shiokawabakery
Makes 4
Ingredients:
- 4 store-bought or homemade koppe pans
- 3 tbsp oil
- 50g kinako
- 40g granulated sugar
Steps:
- Combine kinako and sugar thoroughly. Distribute evenly on a small baking tray, preferably one with high rim. Set aside.
- To prepare the dough, heat oil in a frying pan over medium-low heat for 1 minute. Add the bread and fry for ~1 minute. As the koppe pan burns easily, move it around constantly to ensure that it is fried evenly.
- When the surface is soft and lightly browned, remove from the pan and place it on a paper towel to soak up excess oil.
- While it is still hot, toss and roll the bread around in the sugar mixture. Don’t let it rest for too long as it will be difficult for the powder to adhere to the bread once it has cooled down.
- Once the buns are generously coated, transfer them to a serving plate and sprinkle on the leftover sugar mixture. Enjoy while it is hot.
Check out the original recipe here:
Japanese bread recipes
In light of rising COVID-19 cases domestically, Japan has recently tightened its borders. Until we can visit Japan again, a handmade melon pan is perhaps the closest thing we can get to the ones sold in authentic Japanese bakeries. Give these Japanese bread recipes a go while you wait for international travel to become a reality again.
Check out these articles for more articles related to food:
- Takashi Murakami afternoon tea
- Weird Japanese food combinations
- Coffee jelly recipes
- Anime-inspired food IRL
- Japanese desserts recipes
Cover image adapted from (clockwise from left): @keicyon.megu, @shocolate.0127, and What Santa left behind